MyBatis-Plus
导包
<!--数据库驱动-->
<dependency>
    <groupId>mysql</groupId>
    <artifactId>mysql-connector-java</artifactId>
</dependency>
<!--lomok-->
<dependency>
    <groupId>org.projectlombok</groupId>
    <artifactId>lombok</artifactId>
</dependency>
<!--mybatis-plus-->
<dependency>
    <groupId>com.baomidou</groupId>
    <artifactId>mybatis-plus-boot-starter</artifactId>
    <version>3.0.5</version>
</dependency>
不要同时导入Mybatis和Mybatis-plus的jar包,会存在版本差异
连接数据库
- mysql 5 驱动不同 com.mysql.jdbc.Driver
- mysql 8 驱动不同 com.mysql.cj.jdbc.Driver 需要增加时区而配置
- 高级驱动兼容低驱动,用cj就行
spring.datasource.user=root
spring.datasource.password=123456
spring.datasource.url=jdbc:mysql://localhost:3306/mybatis_plus?useSSL=false&useUnicode=true&characterEncoding=utf-8&serverTimezone=GMT%2B8
spring.datasource.driver-class-name=com.mysql.cj.jdbc.Driver
使用
- 在对应的mapper上继承基本的类BaseMapper
@Repository //代表持久层
public interface UserMapper extends BaseMapper<User>{}
所有的CRUD操作都已经便携而完成了
- 在文件的初始方法xxxApplication里面添加注解
- 扫描mapper文件夹
- @MapperScan("com.yang.mapper")
- 继承了BaseMapper,所有方法都来自于父类,也可以自己编写
- UserMapper目前就不用自己写东西了
- 执行语句
- 查询全部用户
- userMapper.selectList(null);
- 参数是一个Wrapper,条件构造器,这里我们先不写,写null就可以了
- user.forEach(System.out::println);就可以直接输出了
- userMapper.selectList(null);
- 查询全部用户
配置日志
- 可以查看sql执行时的东西
mybatis-plus.configuration.log-impl=org.apache.ibatis.loggin.stdout.StdOutImplmybatis-plus: configuration: log-impl: org.apache.ibatis.logging.stdout.StdOutImpl
CRUD扩展
查询全部用户
@Test
void contextLoads(){
    //参数是一个Wrapper,条件构造器,这里我们先不用写,写上null就可以了
    //查询全部用户
    List<Uuser> users = userMapper.selectList(null);
    users.forEach(System.out::println);
}
插入
@Test
public void testInsert(){
    User user = new User();
    user.setName("名字");
    user.setAge(18);
    user.setEmail("123456789@qq.com");
    int result = userMapper.insert(user);//帮我们自动生成id
    System.out.println(result);//受影响的行数
    System.out.println(user);//发现id会自动回填
}
雪花算法
- 主键生成策略
- 分布式系统唯一id生成
- 链接:https://www.cnblogs.com/haoxinyue/p/5208136.html
- snowflake是Twitter开源的分布式ID生成算法,结果是一个long型的ID。其核心思想是:使用41bit作为毫秒数,10bit作为机器的ID(5个bit是数据中心,5个bit的机器ID),12bit作为毫秒内的流水号(意味着每个节点在每毫秒可以产生 4096 个 ID),最后还有一个符号位,永远是0。具体实现的代码可以参看https://github.com/twitter/snowflake。雪花算法支持的TPS可以达到419万左右(2^22*1000)。
- 对应数据库中的主键(uuid、自增id、雪花算法、redis、zookeeper!)
- 想自增id在pojo方在id上面添加个@TableId(type=IdType.Auto)
- 类型@TableId(type=IdType.xxxx)
public enum IdType{
AUTO(0), //数据库id自增
NONE(1), //未设置主键
INPUT(2), //手动输入
ID_WORKER(3), //默认的全局唯一id
UUID(4), //全局唯一id uuid
ID_WORKER_STR(5); //ID——WORKER 字符串表示法
}
更新
@Test
public void testUpdate(){
User user = new User();
//通过条件自动拼接动态SQL
user.setId(6L);
user.setName("aaa");
//注意:updateById但是参数是一个对象
int i = userMapper.updateById(user);
System.out.println(i);
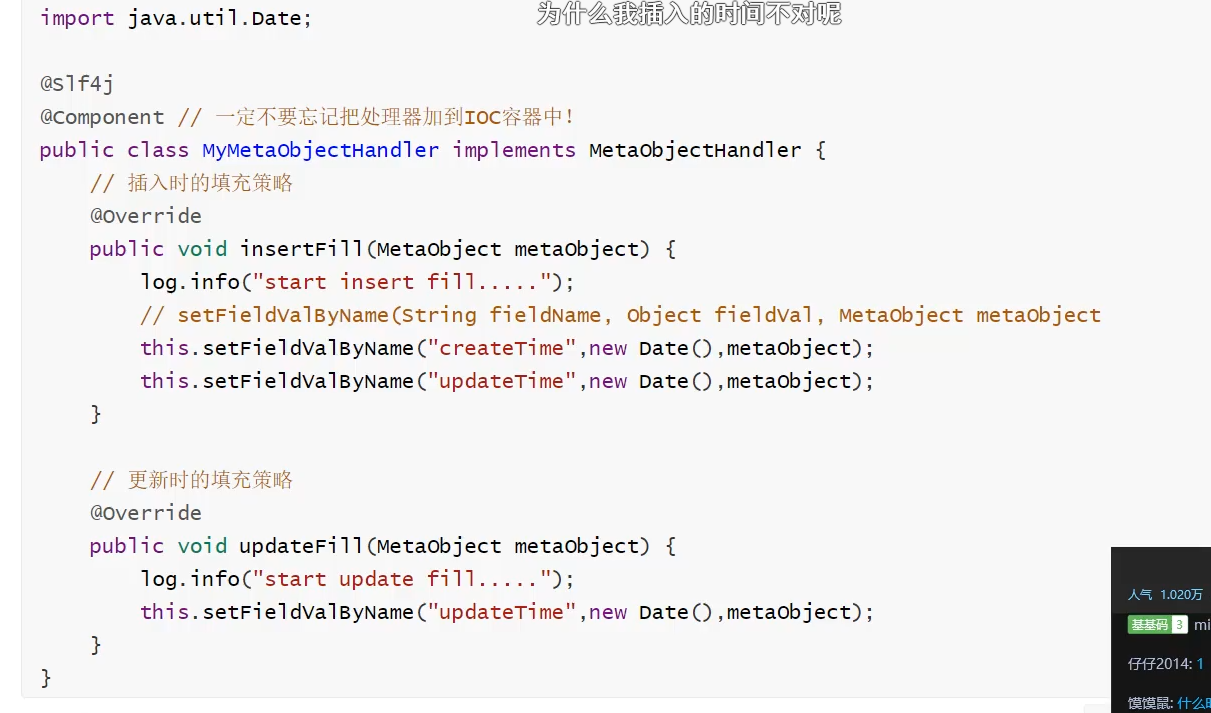
}自动填充
- 创建时间、修改时间!这些个操作一遍都是自动化完成的,我们不希望手动更新!
- 阿里巴巴开发手册:所有的数据库表:gmt_create、gmt_modified几乎所有的表都要配置上!而且需要自动化!
- 在数据库新增个列叫createTime和updateTime类型为datetime默认CURRENT_TIMESTAMP, updateTime选上更新
方式一:数据库级别(工作中不允许你修改数据库)
private Date createTime;
private Date updateTime;
方式二:代码级别
- 在数据库新增个列叫createTime和updateTime类型为datetime,和方法一完全不一样
//字段添加填充内容 @TableField(fill = FieldFill.INSERT) private Date createTime; @TableField(fill = FieldFill.INSERT_UPDATE) private Date updateTime;- 创建个handler里面创建方法MyMetaObjectHandler implements MetaObjectHandler来个注解@Component丢给Spring需要日志的话需要添加@Slf4j
锁
- 乐观锁:十分乐观,它总认为不会出现问题,无论干什么都不去上锁,如果出现问题,再次更新值测试
- version
- new version
- 悲观锁:十分悲观,它总认为宗师出现问题,无论干什么都会上锁!再去操作
乐观锁实现方式
- 取出记录时,获得当前version
- 更新时,带上这个version
- 执行更新时, set version = newVersion where version = oldVersion
- 如果version不对,就更新失败
乐观锁:1.先查询,获得版本号version = 1--A
update user set name = "kuangshen",version = version + 1
where id = 2 and version = 1
--B 线程抢先完成,这个时候version = 2,会导致A修改失败
update user set name = "kuangshen",version = version + 1
where id = 2 and version = 1
测试MP乐观锁插件
- 给数据库中增加version字段 默认是值是1
- 在pojo类的version加一个@Version注解,乐观锁注解
- 注册组件
@MapperScan("com.yang.mapper") //扫描我们的mapper文件夹,在主方法内就不用写这个了 @EnableTransactionManagement //事务注解 @Configyration //配置类 public class MyBatisPlusConfig{ //注册乐观锁插件 @Bean public OptimisticLockerInterceptor optimisticLockerInterceptor(){ return new OptimisticLockerInterceptor(); } } - 测试
//测试乐观锁成功!单线程下
public void testOptimisticLocker1(){
//1.查询用户信息
User user = userMapper.slectById(1L);
//2.修改用户信息
user.setName("kuangshen");
user.setEmail("24736743@qq.com");
//3.执行更新操作
userMapper.updateById(user);
}
//测试乐观锁失败!多线程下
public void testOptimisticLocker2(){
//1.查询用户信息
User user = userMapper.slectById(1L);
//2.修改用户信息
user.setName("kuangshen");
user.setEmail("24736743@qq.com");
//模拟另外一个多线程执行了插队操作
//2.修改用户信息
User user = userMapper.slectById(1L);
user2.setName("kuangshen222");
user2.setEmail("24736743@qq.com");
//3.执行更新操作
userMapper.updateById(user2);
//自旋锁来多次尝试提交!
userMapper.updateById(user); //如果没有乐观锁就会覆盖插队线程的值
}
查询操作
//查询
public void testSelectById(){
    User user = userMapper.selectById(1L);
    System.out.println(user);
}
//批量查询
public void testSelectByBatchId(){
    List<User> users = userMapper.selectBathIds(Arrays.asList(1,2,3));
    users.forEach(System.out::println);
}
//条件查询 map
public void testSelectByBathIds(){
    HashMap<String,Object> map = new HashMap<>();
    //自定义要查询
    map.put("name","狂神说Java");
    map.put("age",3);
    List<User> users = userMapper.selectByMap(map);
    users.forEach(System.out::println);
}
分页查询
分页在网站使用的十分之多!
- 原石的limit进行分页
- pageHelper第三方插件
- MP其实也内置了分页插件
操作
- 配置拦截器,放入MyBatisPlusConfig文件就行
//Spring boot方式 @Configuration @MapperScan("com.baomidou.cloud.service.*.mapper*") public class MybatisPlusConfig { // 旧版 @Bean public PaginationInterceptor paginationInterceptor() { PaginationInterceptor paginationInterceptor = new PaginationInterceptor(); // 设置请求的页面大于最大页后操作, true调回到首页,false 继续请求 默认false // paginationInterceptor.setOverflow(false); // 设置最大单页限制数量,默认 500 条,-1 不受限制 // paginationInterceptor.setLimit(500); // 开启 count 的 join 优化,只针对部分 left join paginationInterceptor.setCountSqlParser(new JsqlParserCountOptimize(true)); return paginationInterceptor; } // 最新版 @Bean public MybatisPlusInterceptor mybatisPlusInterceptor() { MybatisPlusInterceptor interceptor = new MybatisPlusInterceptor(); interceptor.addInnerInterceptor(new PaginationInnerInterceptor(DbType.H2)); return interceptor; } //或者第一步直接 @Bean public PaginationInterceptor paginationInterceptor() { return new PaginationInterceptor(); } } - 直接使用Page对象即可
- 测试分页查询
public void testPage(){
//参数一:当前页
//参数二:页面大小
//使用了分页插件之后,所有的分页操作 也变得简单了
Page<User> page = nwe Page<>(1,5);
userMapper.selectPage(page,null);
page.getRecords().forEach(System.out::println);
System.out.println(page.getTotal());//查看总数页
}
删除
- 根据id删除记录
//id删除
public void testDeleteById(){
userMapper.deleteById(1L);
}
//id批量删除
public void testDeleteBatchId(){
userMapper.deleteBatchIds(Array.asList(1L,2L));
}
//通过map删除
public void testDeleteBatchId(){
HashMap<String,Object> map = new HashMap<>();
map.put("name","狂神说Java");
userMapper.deleteByMap(map);
}
我们在工作中会遇到一些问题:逻辑删除!
逻辑删除
- 物理删除:从数据库中直接移除
- 逻辑删除:再数据库中没有被移除,而是通过一个变量来让他失效!deleted = 0 = deleted = 1
管理员可以查看被删除的记录!防止数据的丢失,类似于回收站!
测试:
- 在数据表中增加一个deleted字段值等于0
- pojo中增加属性,增加注解@TableLogic
- 新版3.1.1不用写@Bean
mybatis-plus: global-config: db-config: logic-delete-field: flag # 全局逻辑删除的实体字段名(since 3.3.0,配置后可以忽略不配置步骤2) logic-delete-value: 1 # 逻辑已删除值(默认为 1) logic-not-delete-value: 0 # 逻辑未删除值(默认为 0) - 测试:
//id删除 public void testDeleteById(){ userMapper.deleteById(1L); } //id批量删除 public void testDeleteBatchId(){ userMapper.deleteBatchIds(Array.asList(1L,2L)); } //通过map删除 public void testDeleteBatchId(){ HashMap<String,Object> map = new HashMap<>(); map.put("name","狂神说Java"); userMapper.deleteByMap(map); } - 走的并不是删除操作,做了更新操作,记录依旧在数据库deleted=1了,用了MP直接查就行了,不用判断,自动过滤逻辑删除的字段
以上的所有CRUD操作及其扩展操作,我们必须精通掌握!会大大提高你的工作和写项目的效率!
性能分析插件
我们在平时的开发中,会遇到一些慢sql。测试!druid....
MP也提供心梗分析插件,如果超过这个时间就停止运行
- 导入插件
- 测试使用
- SQL执行效率插件【3.1.1以后不用】
@Bean
@Profile({"dev","test"}) //设置dev test环境开启,保证我们的效率
public PerformanceInterceptor performanceInterceptor(){
PerformanceInterceptor performanceInterceptor = new PerformanceInterceptor();
//在工作中,不允许用户等待
performanceInterceptor.setMaxTime(100);//ms毫秒 设置sql执行的最大时间,如果超过了则不执行,然后会报错
performanceInterceptor.setFormat(true);//开启格式化代码
    return performanceInterceptor;
}
4.配置
- 设置开发环境
spring.profiles.active=dev2.Maven
<dependency>
<groupId>p6spy</groupId>
<artifactId>p6spy</artifactId>
<version>最新版本</version>
</dependency>
3.yml
spring:
datasource:
driver-class-name: com.p6spy.engine.spy.P6SpyDriver
url: jdbc:p6spy:h2:mem:test
...
4.spy.properties
#3.2.1以上使用
modulelist=com.baomidou.mybatisplus.extension.p6spy.MybatisPlusLogFactory,com.p6spy.engine.outage.P6OutageFactory
#3.2.1以下使用或者不配置
#modulelist=com.p6spy.engine.logging.P6LogFactory,com.p6spy.engine.outage.P6OutageFactory
# 自定义日志打印
logMessageFormat=com.baomidou.mybatisplus.extension.p6spy.P6SpyLogger
#日志输出到控制台
appender=com.baomidou.mybatisplus.extension.p6spy.StdoutLogger
# 使用日志系统记录 sql
#appender=com.p6spy.engine.spy.appender.Slf4JLogger
# 设置 p6spy driver 代理
deregisterdrivers=true
# 取消JDBC URL前缀
useprefix=true
# 配置记录 Log 例外,可去掉的结果集有error,info,batch,debug,statement,commit,rollback,result,resultset.
excludecategories=info,debug,result,commit,resultset
# 日期格式
dateformat=yyyy-MM-dd HH:mm:ss
# 实际驱动可多个
#driverlist=org.h2.Driver
# 是否开启慢SQL记录
outagedetection=true
# 慢SQL记录标准 2 秒
outagedetectioninterval=2
- 设置开发环境
条件构造器
十分重要:Wrapper
我们写一些复杂的sql就可以用它来代替
- 查询name不为空的用户,并且邮箱不为空的用户,年龄大于等于12
void test1(){ //查询name不为空的用户,并且邮箱不为空的用户,年龄大于等于12 QuerWrapper<User> wrapper = new QuerWrapper<>(); wrapper .isNotNull("name")//不为空 .isNotNull("email")//不为空 .ge("age",12);//大于等于 userMapper.selectList(wrapper).forEach(System.out::println); } - 名字等于狂神说
void test2(){ QueryWrapper<User> wrapper = new QueryWrapper<>(); wrapper.eq("name","狂神说"); User user = userMapper.selectOne(wrapper);//查询一个数据,出现多个结果使用List或Map System.out.println(user); } - 查询年龄在20~30岁之间的用户
void test3(){ QueryWrapper<User> wrapper = new QueryWrapper<>(); wrapper.between("age",20,30);//区间 Integer count = userMapper.selectCount(Wrapper);//查询结果数 System.out.println(count); } - 模糊查询,记住查看输出的SQL进行分析
void test4(){ QueryWrapper<User> wrapper = new QueryWrapper<>(); //左和右 %e% wrapper.notLike("name","e").likeRight("email","t%"); List<Map<String,Object>> maps = userMapper.selectMaps(Wrapper);//查询结果数 maps.forEach(System.out::println); } - 内链接 in查询
void test5(){ QueryWrapper<User> wrapper = new QueryWrapper<>(); //id在子查询中查出来 wrapper.inSql("id","select id from user where id < 3"); List<Object> objects = userMapper.selectObjs(Wrapper); objects.forEach(System.out::println); } - 排序
void test6(){
QueryWrapper<User> wrapper = new QueryWrapper<>();
//通过id进行排序
wrapper.orderByDesc("id");//降序
wrapper.orderByAsc("id");//升序
List<User> users = userMapper.selectList(Wrapper);
users.forEach(System.out::println);
}
代码自动生成器
禁用thymeleaf缓存
spring.thymeleaf.cache=false- AutoGenerator 是 MyBatis-Plus 的代码生成器,通过 AutoGenerator 可以快速生成 Entity、Mapper、Mapper XML、Service、Controller 等各个模块的代码,极大的提升了开发效率。
- 创建个测试类叫xxxCode
//代码自动生成器
public class KuangCode{
public static void main(String[] args){
    //需要构建一个代码自动生成器 对象
    AutoGenerator mpg = new AutoGenerator();
    //配置策略
    //1、全局配置
    GlobalConfig gc = new GlobalConfig();
    String projectPath = System.getProperty("user.dir");
    gc.setOutputDir(projectPath + "/src/main/java");//路径
    gc.setAuthor("狂神说");//作者
    gc.setOpen(false);//是否打开生成的文件夹
    gc.setFileOverride(false);//是否覆盖
    gc.setServiceName("%sService");//去service的I前缀
    gc.setIdType(IdType.ID_WORKER);//算法
    gc.setDateType(DateType.ONLY_DATE);//日期
    gc.setSwagger2(true);//Swagger文档
    mpg.setGlobalConfig(gc);
    //2.设置数据源
    DateSourceConfig dsc = new DataSourceConfig();
    dsc.setUrl("jdbc:mysql://localhost:3306/mybatis?serverTimezone=UTC&useUnicode=true&characterEncoding=utf-8");
    dsc.setDriverName("com.mysql.cj.jdbc.Driver");
    dsc.setUsername("root");
    dsc.setPassword("123456");
    dsc.setDbType(DBType.MYSQL);
    mpg.setDataSource(dsc);
    //3.包的配置
    PackageInfo pc = new PackageConfig();
    pc.setModuleName("blog");
    pc.setParent("com.kuang");
    pc.setEntity("pojo");
    pc.setMapper("mapper");
    pc.setService("service");
    pc.setController("controller");
    mpg.setPackageInfo(pc);
    //4.策略
    StrategyConfig strategy = new StrategyConfig();
    strategy.setInclude("user","user","admin");//设置要映射的表名
    strategy.setNaming(NamingStrategy.underline_to_camel);
    strategy.setColumnNaming(NamingStrategy.underline_to_camel);
    strategy.setEntityLombokModel(true);//自动生成Lombok
    strategy.setLogincDeleteFieldName("deleted");
    //自动填充配置
    TableFill gmtCreate = new TableFill("gmt_create",FieldFill.INSERT);
    TableFill gmtModified = new TableFill("gmt_modified",FieldFill.INSERT_UPDATE);
    ArrayList<TableFills> tableFills = new ArrayList<>();
    tableFills.add(gmtCreate);
    tableFills.add(gmtModified);
    strategy.setTableFillList(tableFills);
    //乐观锁
    strategy.setVersionFieldName("version");
    //驼峰命名
    strategy.setRestControllerStyle(true);
    strategy.setControllerMappingHyphenStyle(true);//localhost:8080/hello_id_2
    mpg.setStrategy(strategy);
    mpg.execute();//执行
}
}
完章

文章评论